Iceland gear and packing

For my own reference, here is the overwhelming amount of gear I packed for my Iceland tour, and how I arranged it.

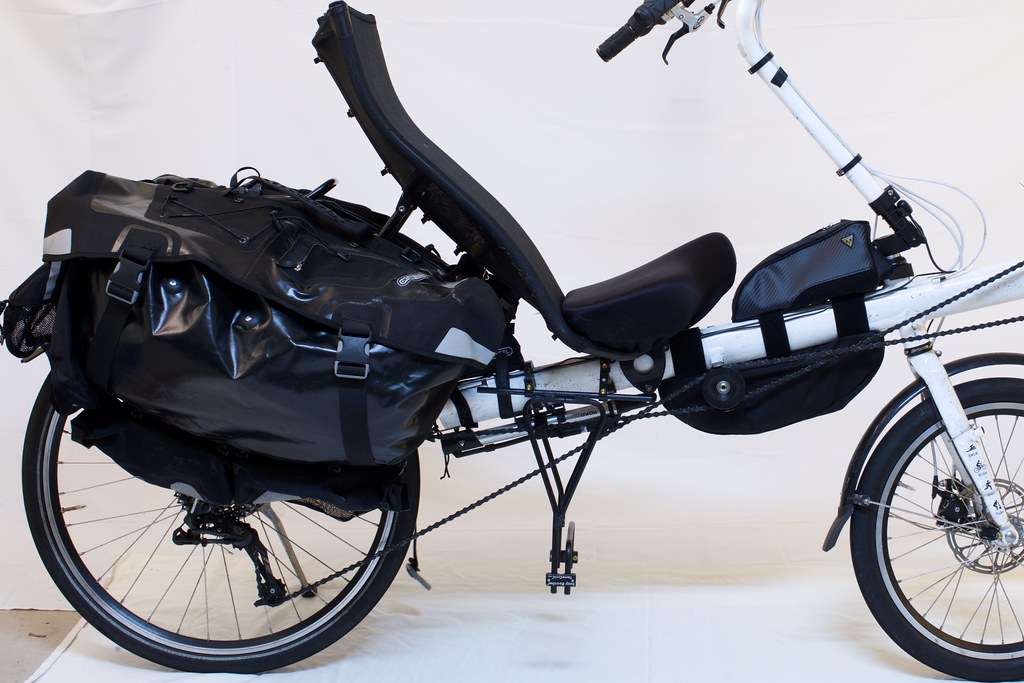
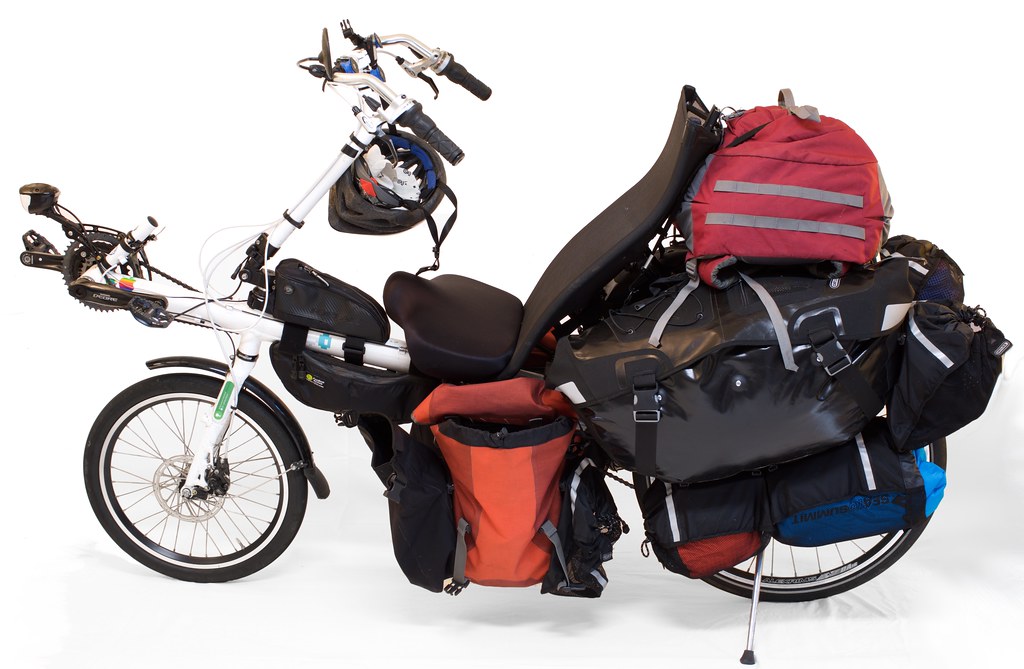
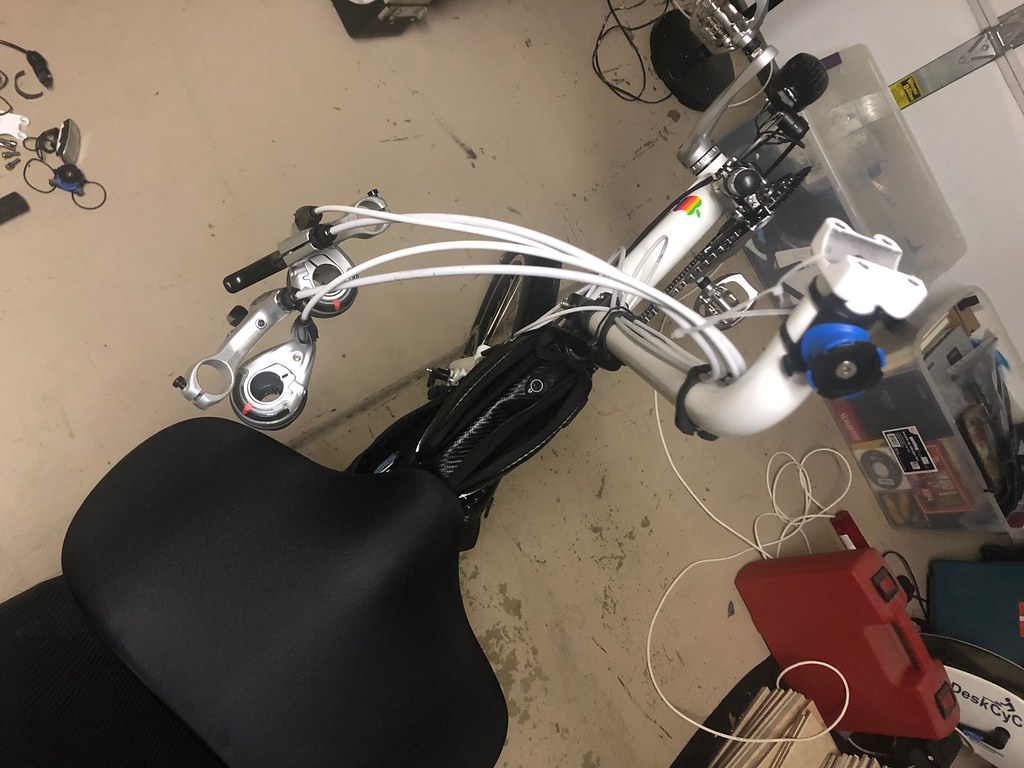
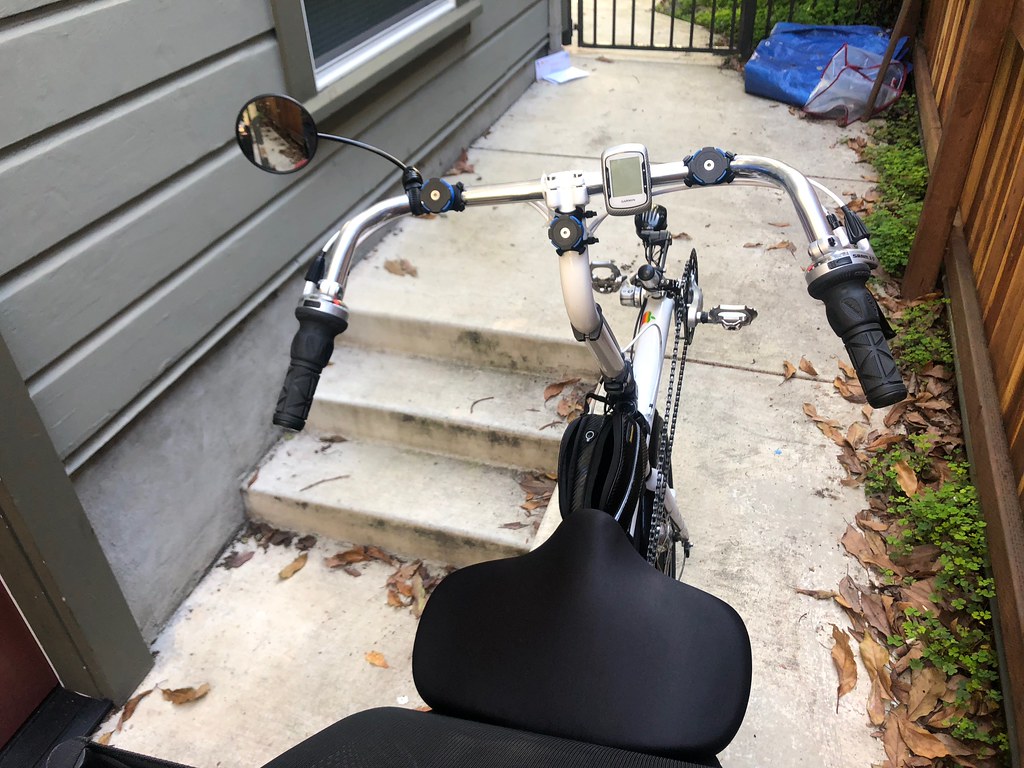
This is what everything looks like packed onto the bike:

Here are the bags without the bicycle:

In the back: Two Ortlieb sport packer plus bags, each with an add-on net pocket and an add-on large roll-top pocket.

In the middle: Two ortlieb recumbent bags. The one on the left has three net bags attached to its underside in a row. The one on the right has a net bag, and then two small roll-top bags attached below, since it hangs over the drivetrain of the bike.

In the foreground: A Kelty Redwing backpack. On the loaded bike, this is placed sideways on top of the recumbent bags, where it fits nicely behind the seat, and is held down with two bungee cords.

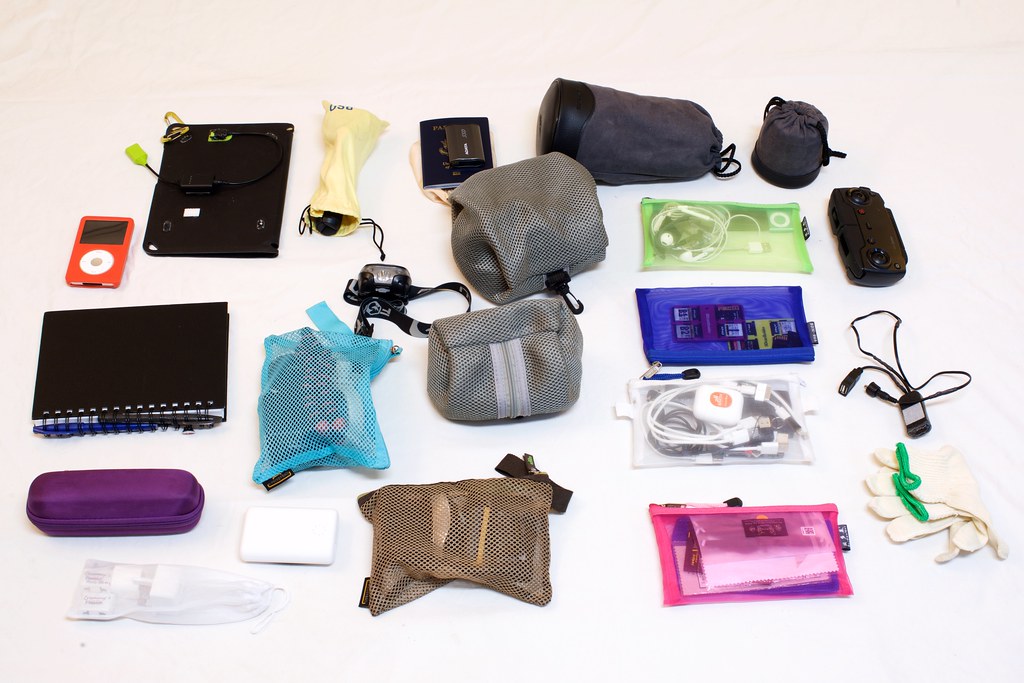
This is all the gear that’s held in the Kelty backpack and the recumbent bags, or in the add-on bags attached to the recumbent bags.

The sleeping bag, with an inflatable insert and an extra liner included, is kept inside the large cotton sack which is then stuffed into the right-side recumbent bag and takes up all the space. The blue bag of rain gear goes into the net bag on that side, along with the raincoat, and the small add-on bags that hang over the drivetrain carry the bicycle lock and the drone.

The recumbent bag on the left side of the bike carries the tent, the stakes, and the pump. Suspended in the net bags beneath it are the blue sack with hiking shoes inside, and the red sack with pants, swimsuit, and other off-bike clothing. The net bag on the rear carries the big wool sweater. The yellow sack of sleeping gear and the other bags go into the backpack.

All this stuff goes into the sport packer bags, along with the laptop and the camera which are not pictured.

This is the charging gear for both the drone and the laptop, with a Y-connector so that they can both be run from one power cord with one international adapter. Between the two charging bricks, six USB devices can be charged at the same time.

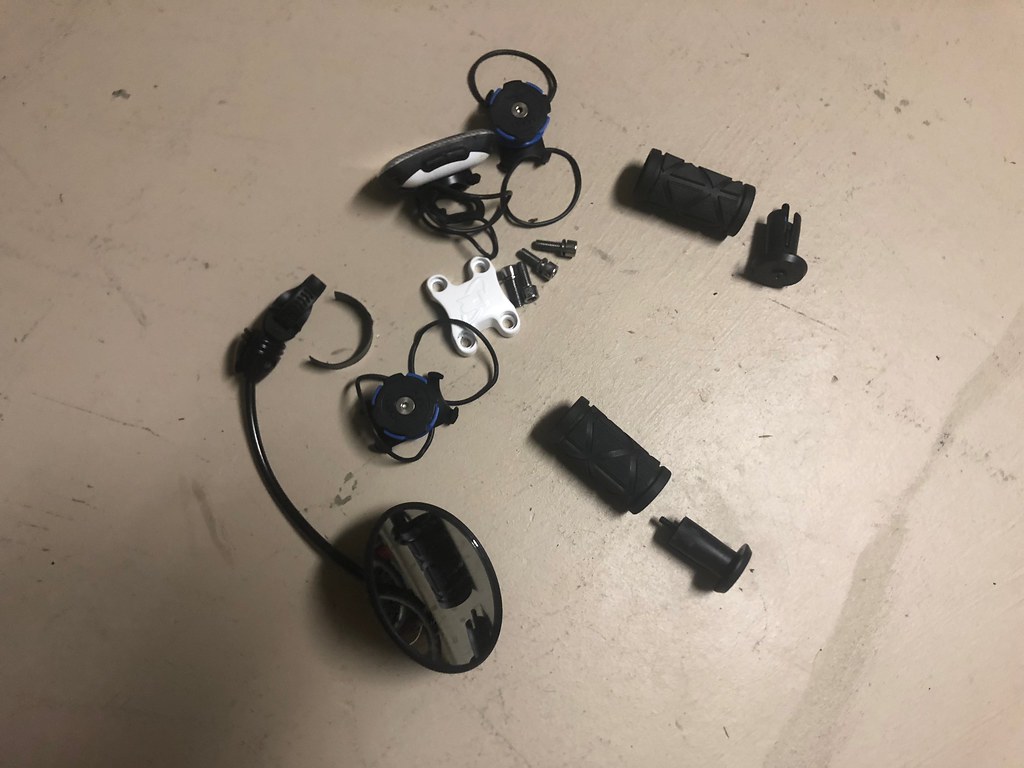
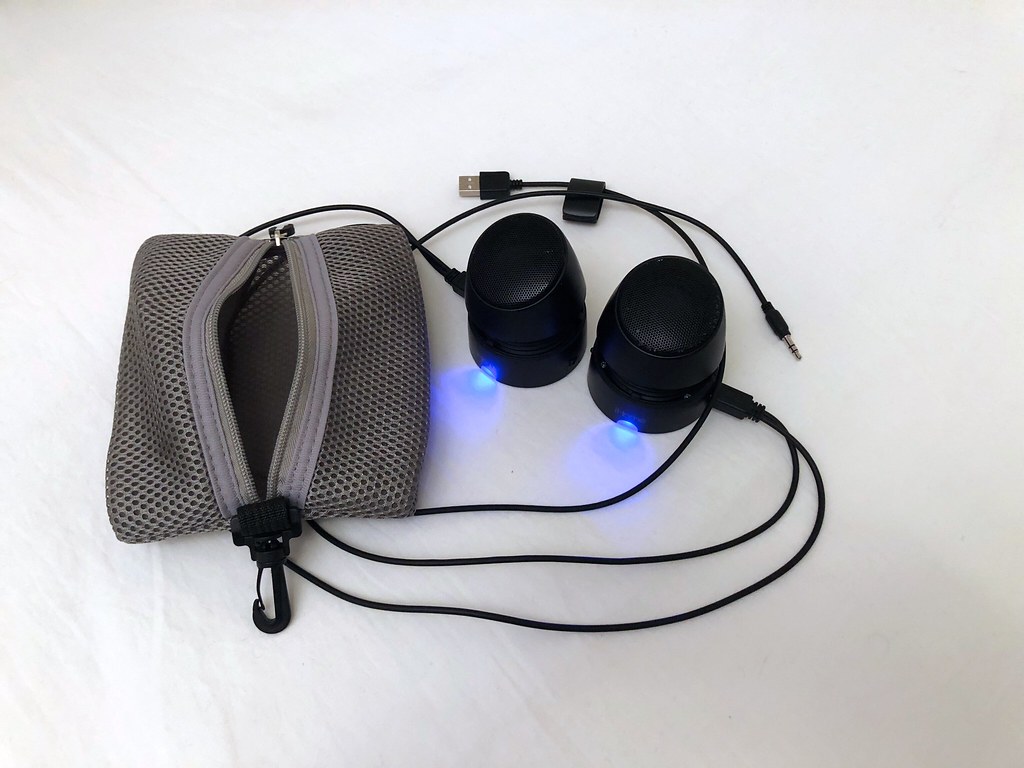
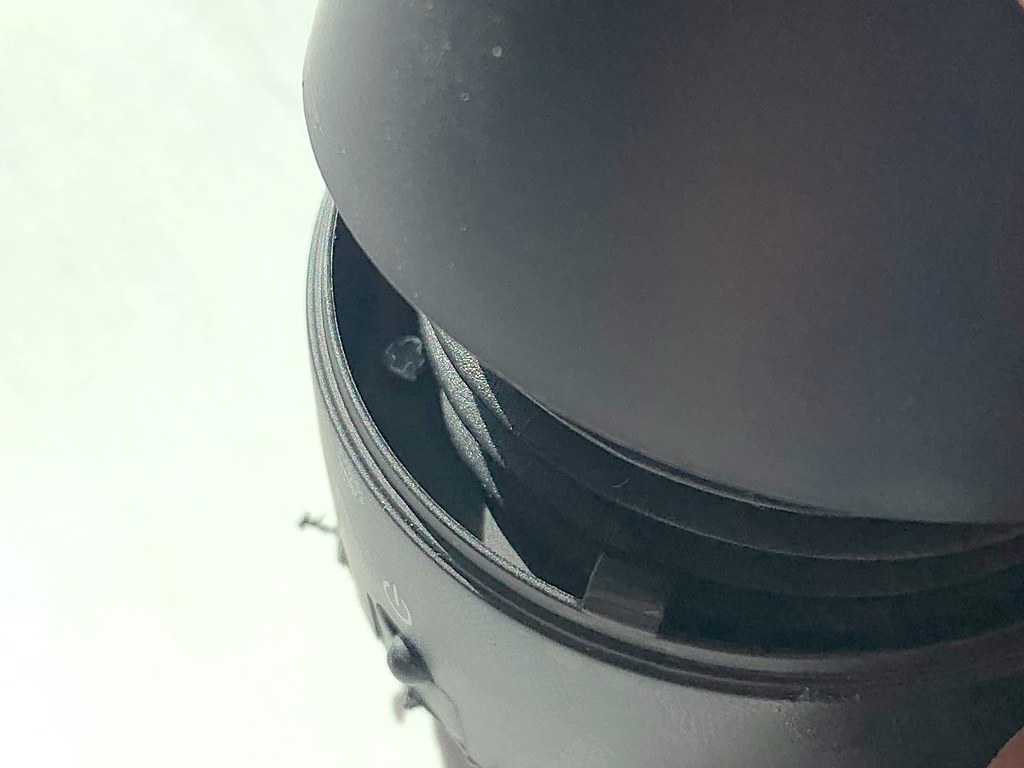
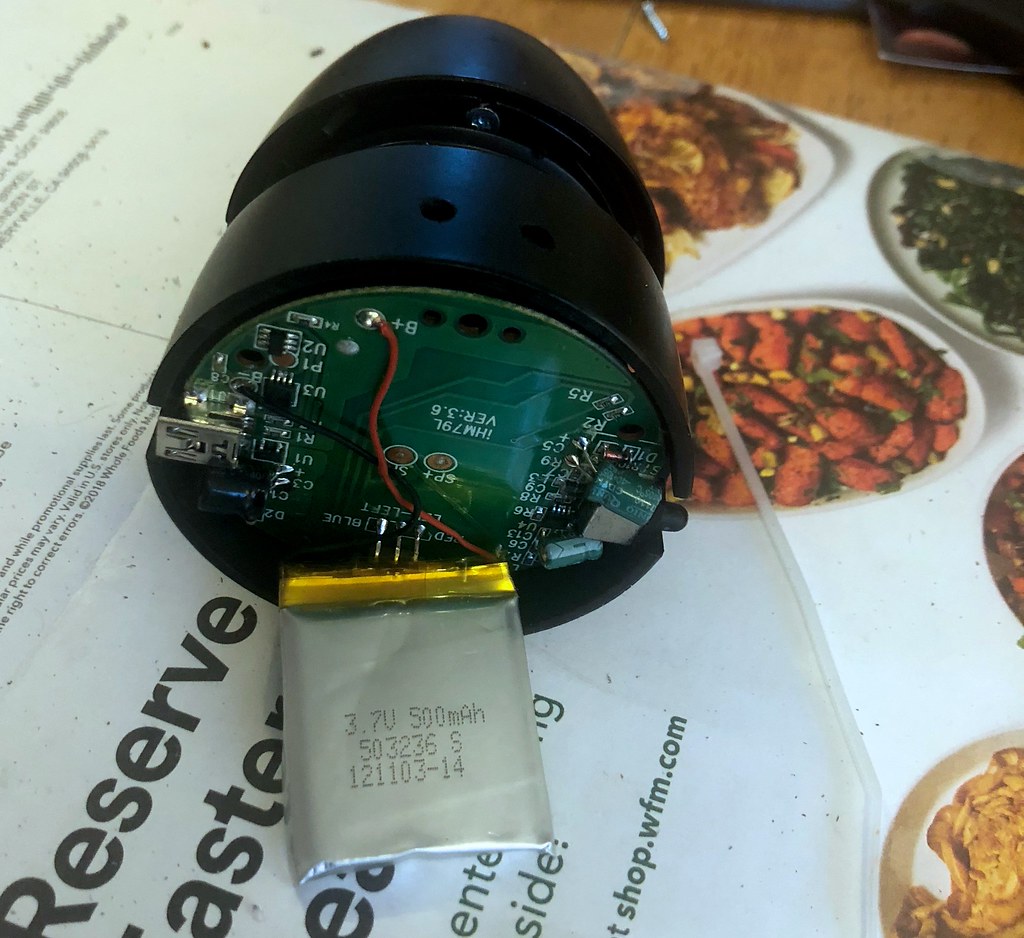
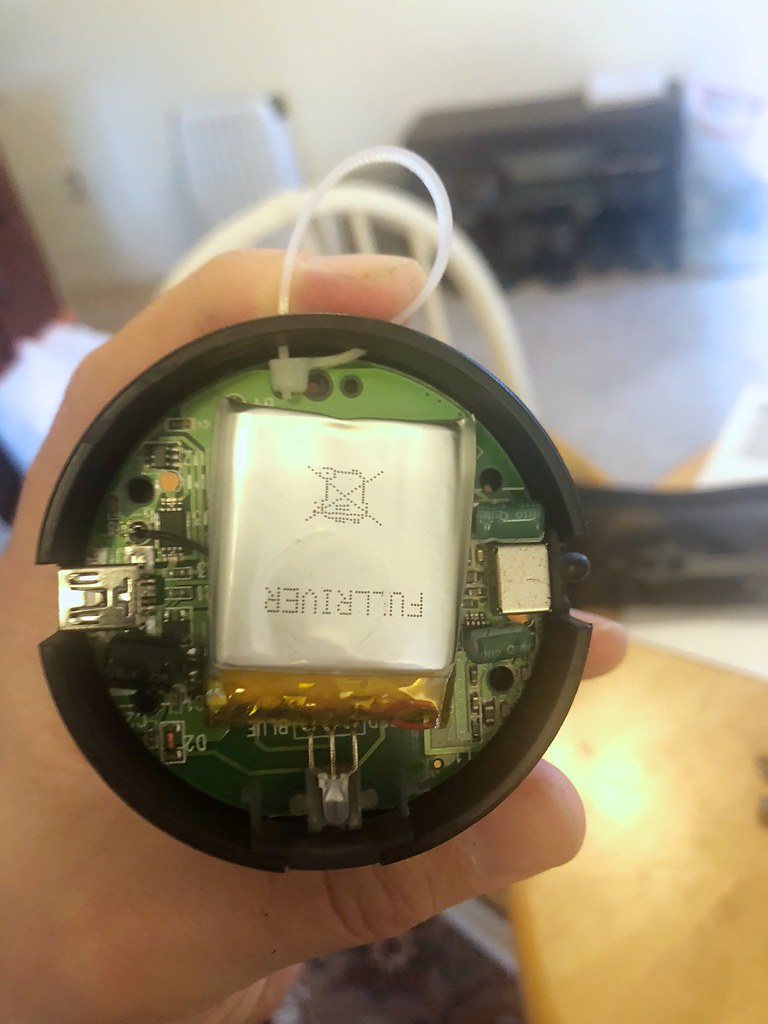
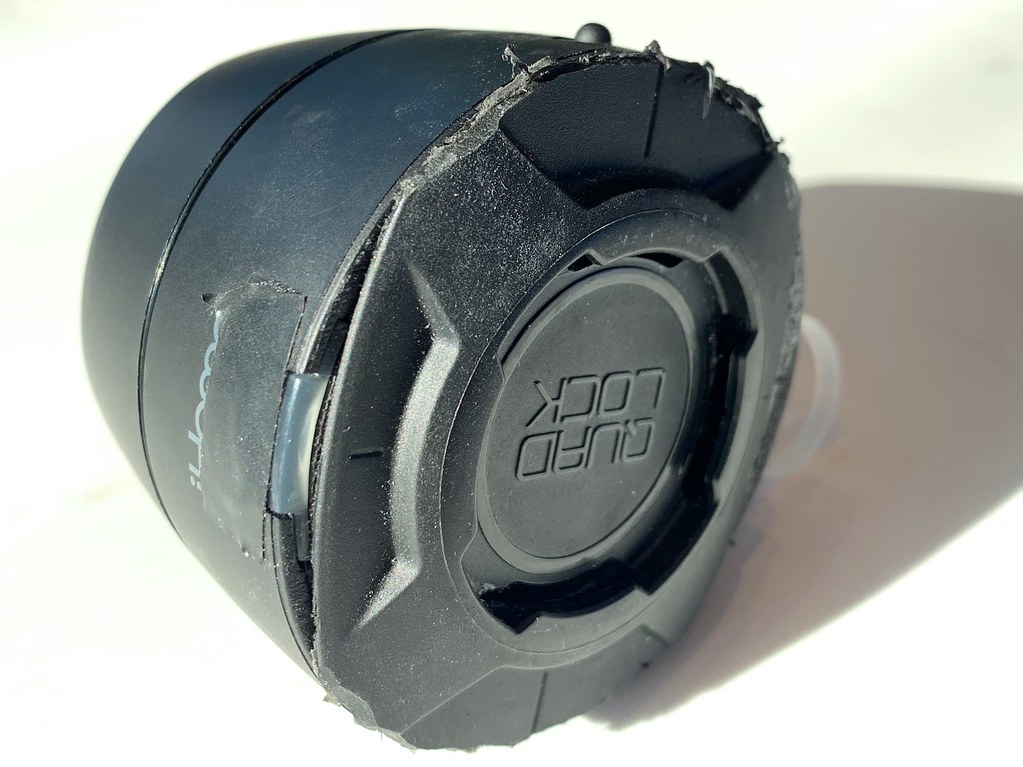
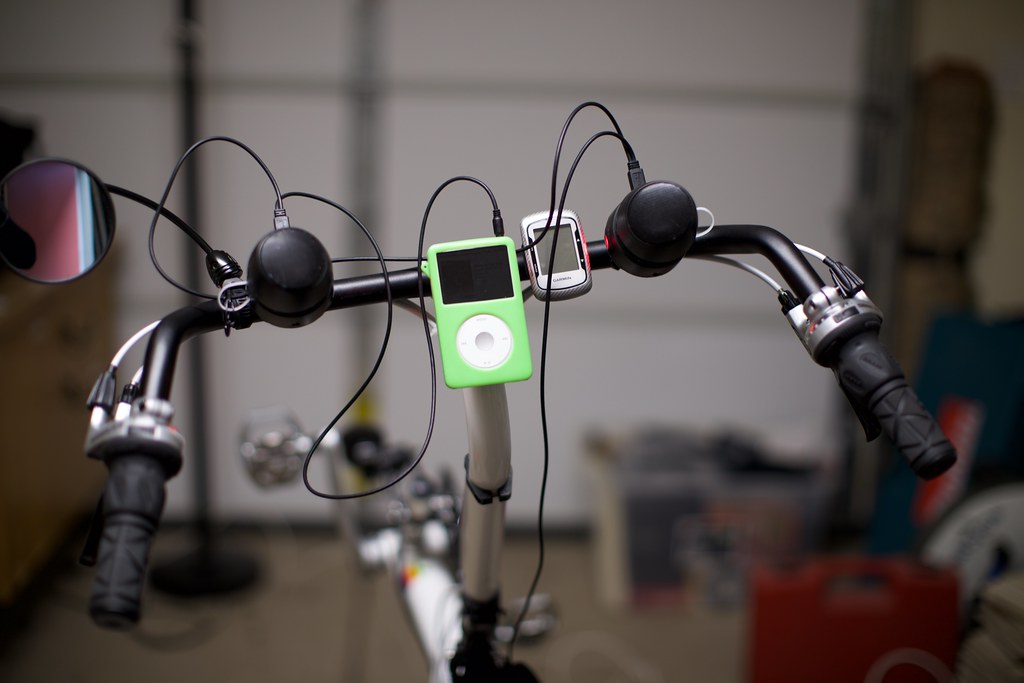
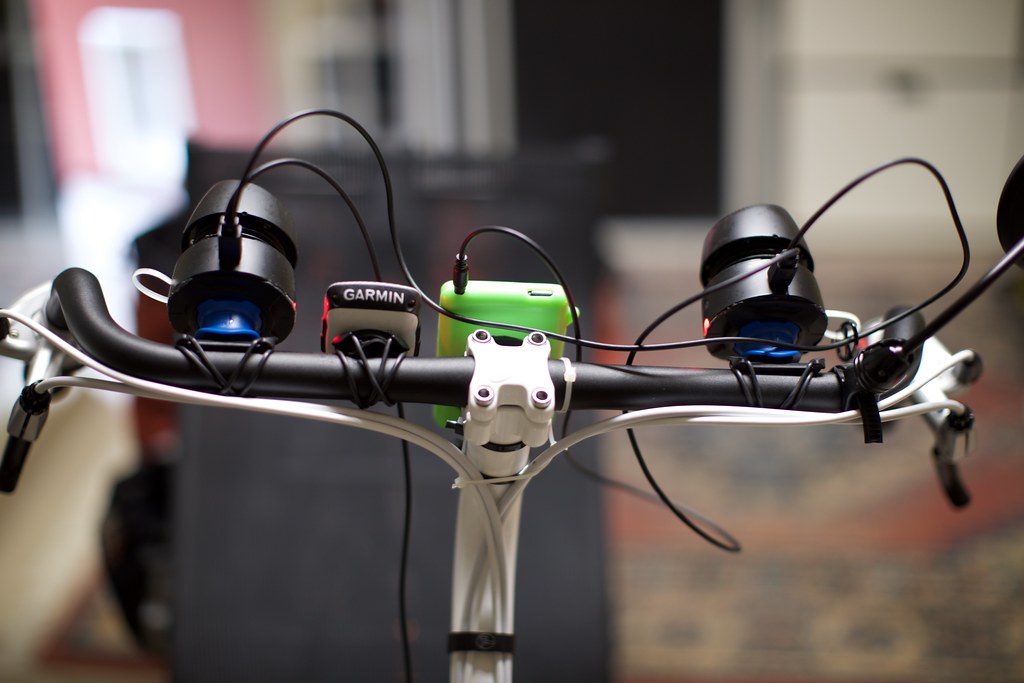
These are the portable speakers, adapted to attach to the handlebars of the bike. There’s also an old iPod mini in here, for playing bedtime music. An iPod shuffle is not suitable for this purpose since it has no ability to stop playing! It will always repeat the current playlist forever or until it runs out of power! How silly. Not that it matters, since all iPods have been discontinued and will soon die out, and we will all be locked into digital subscription services and completely abandon the whole idea of controlling what we listen to without it being mediated from one minute to the next by a jealous corporate overlord in the sky.

This is a kit of spare music hardware. None of it is essential; it’s just here to give me options, or in case something breaks. Spare headphones, a spare microphone wire, airpods, a bluetooth transmitter, et cetera.

These are camera accessories. A macro attachment (not very useful but very lightweight, so might as well bring it), a wireless camera control that pairs with an iPhone app, an external IR focus-assist lamp, a tripod collar, and a smaller tripod for the iPhone.

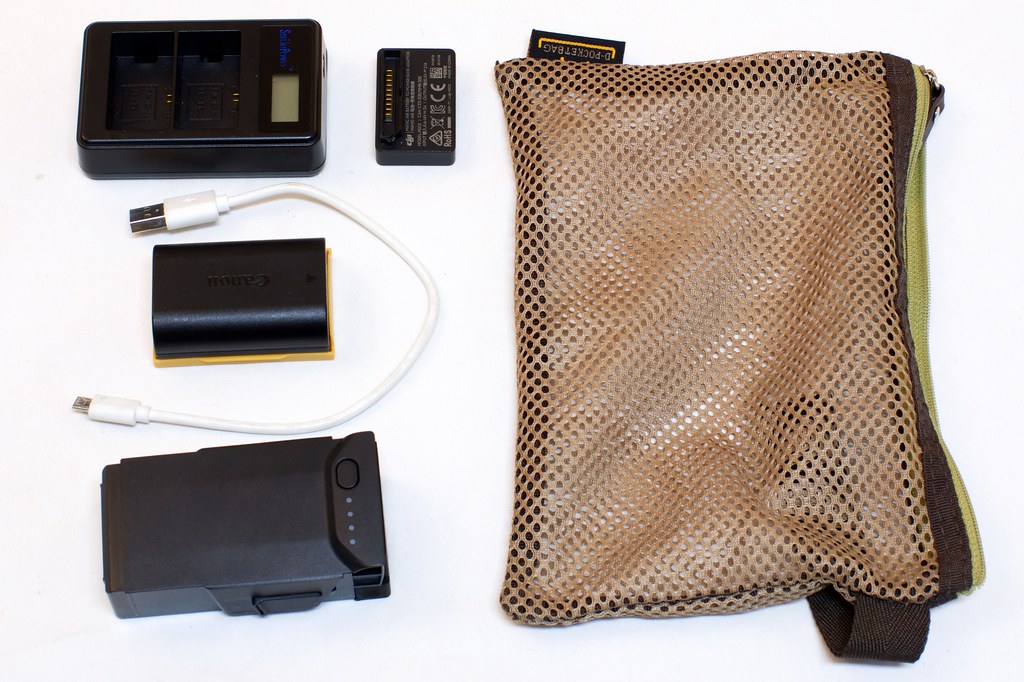
Camera and drone charging stuff, plus an extra cable.

Lens and laptop cleaning cloths, plus a set of spare blades for the drone.

A collection of media cards, holding music, audiobooks, photo archives, and other stuff that’s non-essential and can be deleted as necessary to make room for photos. All formated APFS with encryption on, for the heck of it.

Micro-USB charging cables, a camera card reader, an add-on hub for the laptop, and various small adapters to extend the utility of the micro-USB cables.

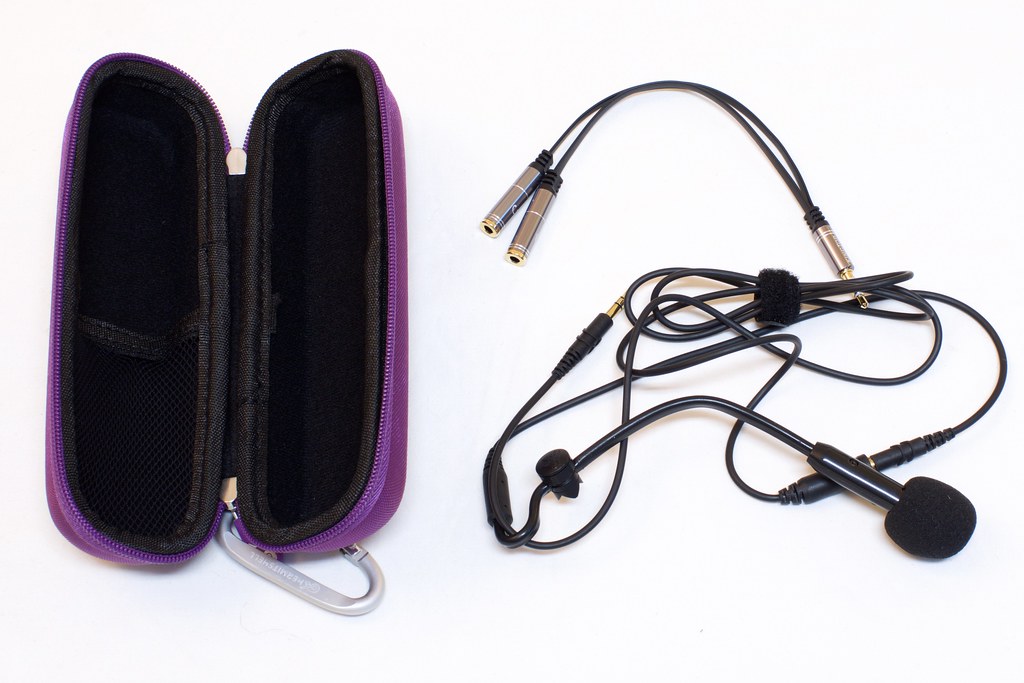
A boom microphone for calling up friends and for video conferencing in strange places. The strangest place I’ve used this so far is by the side of the road next to a geothermal power plant in the middle of Iceland. The boom snaps into place on the side of my headphones, using a small stick-on magnet. It works with the laptop and the iPhone lightning adapter, and it sounds far better than anything else I’ve tried.

The travel toolkit. This is kept in the bag under the seat, along with a small tire pump and an emergency spoke repair wire.

The kit contains everything I need to disassemble the bike and put it back together, including removing the pedals and seat. I can repair chain, fix a flat, replace broken cables, patch wires, adjust brakes and shifters, and also prepare food and trim my nails and mustache. Each of these tools has had a lot of thought put into it.

The rest of the space on the bike is occupied by myself, two large water sacks, and whatever food I happen to be carrying at the time.

Comparison of Heimplanet tents

Small Tent (The Fistral) – 2.9 kg / 6.4 lb

  • About 2 minutes to inflate with small pump.
  • Makes its full shape only after using at least two stakes.
  • Great for single-night stays and time spent mostly on the bike in unpopulated areas.
  • More risky because far more equipment needs to stay outside under the tent flaps.
  • Not good for remaining indoors during rainy days, due to low ceiling and lack of room.
  • Great weight-to-space ratio.
  • Decent for rain, not great for snow.
  • Line of pockets at front is good for small items but additional after-market hanging storage should be added.

Note that in all the photos below, I have attached a large Heimplanet tarp to the side of the Fistral, creating a enormous vestibule. (See postscript at the bottom of this post.)

Another site, another setup.
https://live.staticflickr.com/65535/52929995462_f9300071ce_b.jpg
https://www.flickr.com/photos/57897385@N07/52929995462/
https://live.staticflickr.com/65535/52929995462_f9300071ce_s.jpg
2023-05-20-230307-IMG_6921

Another site, another setup.

Tent all spread out, ready to inflate.
https://live.staticflickr.com/65535/48326198801_7a77ef770d_b.jpg
https://www.flickr.com/photos/57897385@N07/48326198801/
https://live.staticflickr.com/65535/48326198801_7a77ef770d_s.jpg
IMG_9304

Tent all spread out, ready to inflate.

Tent inflated, with bicycle stowed under, from a different angle.
https://live.staticflickr.com/65535/48326326967_3b918a0e03_b.jpg
https://www.flickr.com/photos/57897385@N07/48326326967/
https://live.staticflickr.com/65535/48326326967_3b918a0e03_s.jpg
IMG_9306

Tent inflated, with bicycle stowed under, from a different angle.

Doing laundry in the midday sun.
https://live.staticflickr.com/65535/51384705438_49db328e38_b.jpg
https://www.flickr.com/photos/57897385@N07/51384705438/
https://live.staticflickr.com/65535/51384705438_49db328e38_s.jpg
2021-08-08-142103-IMG_8817

Doing laundry in the midday sun.

Drying out items before packing.
https://live.staticflickr.com/65535/51383131574_3b4131ceb3_b.jpg
https://www.flickr.com/photos/57897385@N07/51383131574/
https://live.staticflickr.com/65535/51383131574_3b4131ceb3_s.jpg
2021-08-05-101928-IMG_8554

Drying out items before packing.

Comfy as usual!
https://live.staticflickr.com/65535/51383393180_6a12535240_b.jpg
https://www.flickr.com/photos/57897385@N07/51383393180/
https://live.staticflickr.com/65535/51383393180_6a12535240_s.jpg
2021-08-05-222700-IMG_8590-2

Comfy as usual!

Tent inflated, with bicycle stowed under attached tarp. That red mark is the taillight, visible through the fabric.
https://live.staticflickr.com/65535/48326198561_d04d54e49a_b.jpg
https://www.flickr.com/photos/57897385@N07/48326198561/
https://live.staticflickr.com/65535/48326198561_d04d54e49a_s.jpg
IMG_9305

Tent inflated, with bicycle stowed under attached tarp. That red mark is the taillight, visible through the fabric.

Snug as a bug.
https://live.staticflickr.com/65535/48326326647_671b33159d_b.jpg
https://www.flickr.com/photos/57897385@N07/48326326647/
https://live.staticflickr.com/65535/48326326647_671b33159d_s.jpg
IMG_9310

Snug as a bug.

You can see my hack job here, where I ziptied a tarp to the side of the tent. From a distance it almost looks like it was designed this way…
https://live.staticflickr.com/65535/48326333202_154aa5089b_b.jpg
https://www.flickr.com/photos/57897385@N07/48326333202/
https://live.staticflickr.com/65535/48326333202_154aa5089b_s.jpg
2019-07-17_11-18-56-66+01-00_E33A3643

You can see my hack job here, where I ziptied a tarp to the side of the tent. From a distance it almost looks like it was designed this way…

The tent, tucked into a nice corner of the Búðardalur campground.
https://live.staticflickr.com/65535/48524607042_633bb4fa20_b.jpg
https://www.flickr.com/photos/57897385@N07/48524607042/
https://live.staticflickr.com/65535/48524607042_633bb4fa20_s.jpg
IMG_9826

The tent, tucked into a nice corner of the Búðardalur campground.

Had to use one guyline here, on account of the high wind. Still a pretty good site!
https://live.staticflickr.com/65535/51476375743_5f67153c86_b.jpg
https://www.flickr.com/photos/57897385@N07/51476375743/
https://live.staticflickr.com/65535/51476375743_5f67153c86_s.jpg
2021-09-03-101858-IMG_9347

Had to use one guyline here, on account of the high wind. Still a pretty good site!

Another fine camping spot.
https://live.staticflickr.com/65535/51477046015_770898d4e8_b.jpg
https://www.flickr.com/photos/57897385@N07/51477046015/
https://live.staticflickr.com/65535/51477046015_770898d4e8_s.jpg
2021-09-03-212522-IMG_9426

Another fine camping spot.

All set up for a long stay.
https://live.staticflickr.com/65535/51476395823_b88cdcb9d2_b.jpg
https://www.flickr.com/photos/57897385@N07/51476395823/
https://live.staticflickr.com/65535/51476395823_b88cdcb9d2_s.jpg
2021-08-31-195100-IMG_9294

All set up for a long stay.

Set up in the corner of the campground, for maximum wind blockage.
https://live.staticflickr.com/65535/48576260607_60594a3652_b.jpg
https://www.flickr.com/photos/57897385@N07/48576260607/
https://live.staticflickr.com/65535/48576260607_60594a3652_s.jpg
IMG_0087

Set up in the corner of the campground, for maximum wind blockage.

The Fistral is my favorite one-person bike touring tent. It’s roomy, versatile, and absurdly easy to set up over and over again, even in the dark. The extra weight is worth it. I’ve taken it all over, from the Nevada desert to the rainy shores of Iceland.

Medium-Small Tent (The Kirra) – 3.8 kg / 8.3 lb

  • About 2.5 minutes to inflate with the small pump. Can easily be inflated and then staked down after.
  • Needs at least three stakes to take its full shape.
  • Easy to move and reposition even for one person.
  • Interior can be cleaned by picking the entire tent up and shaking it with the door open.
  • Vestibule is relatively large.
  • Ventilation is not great.
  • Quite good weight-to-space ratio.
  • Much more spacious on the inside than you’d expect. Two adults can sleep in it easily.
  • Good in light wind, but heavy wind requires multiple guy lines attached to elevated terrain/objects, e.g. a fencepost.
Reading the morning memes.
https://live.staticflickr.com/65535/52930972205_461423913e_b.jpg
https://www.flickr.com/photos/57897385@N07/52930972205/
https://live.staticflickr.com/65535/52930972205_461423913e_s.jpg
2023-05-21-093551-IMG_6927

Reading the morning memes.

Setting up the tent for the last time, and trying not to get bitten in the process…
https://live.staticflickr.com/65535/53111793582_f69b7edede_b.jpg
https://www.flickr.com/photos/57897385@N07/53111793582/
https://live.staticflickr.com/65535/53111793582_f69b7edede_s.jpg
2023-07-19-211011-IMG_9675

Setting up the tent for the last time, and trying not to get bitten in the process…

https://live.staticflickr.com/65535/53112789495_93e9f4f402_b.jpg
https://www.flickr.com/photos/57897385@N07/53112789495/
https://live.staticflickr.com/65535/53112789495_93e9f4f402_s.jpg
2023-07-19-091934-IMG_9614
https://live.staticflickr.com/65535/53112186694_1e20f401d5_b.jpg
https://www.flickr.com/photos/57897385@N07/53112186694/
https://live.staticflickr.com/65535/53112186694_1e20f401d5_s.jpg
2023-06-29-105604-IMG_8489
https://live.staticflickr.com/65535/53905176534_3ddc79d3bb_b.jpg
https://www.flickr.com/photos/57897385@N07/53905176534/
https://live.staticflickr.com/65535/53905176534_3ddc79d3bb_s.jpg
2024-07-28-183702-IMG_2654

Aside from the difficulty in high wind (30+ mph), this is a really great all-around tent. I’d say it’s the best one Heimplanet makes, drawing on everything they’ve learned from previous designs.

Medium Tent (The Cave) – 4.8 kg / 10.6 lb

  • About 3 minutes to inflate with small pump. Can easily be inflated and then staked down after.
  • Least reliant on guy lines and stakes; keeps its full shape without any.
  • Easy to move and reposition even for one person.
  • Interior can be cleaned by picking the entire tent up and shaking it with the door open.
  • Four pockets, two on each side, make a division between sleep gear and outside gear.
  • Poor weight-to-space ratio. Almost twice as heavy as Fistral with 2x the space.
  • Single round door is small and very awkward to use.
  • Relatively poor ventilation.
  • Vestibule area is relatively small but reasonably secure from rain.
  • Good in rain and wind and snow without using guy lines.
  • Can remain operational even if two out of the five struts fail (leak), though it will sag without guylines.
  • Extremely good performance in high wind when staked down.
https://live.staticflickr.com/65535/50363940788_ea1a96019f_b.jpg
https://www.flickr.com/photos/57897385@N07/50363940788/
https://live.staticflickr.com/65535/50363940788_ea1a96019f_s.jpg
2018-03-13_22-34-50_IMG_5939
https://live.staticflickr.com/65535/50364723537_b6112b3aa7_b.jpg
https://www.flickr.com/photos/57897385@N07/50364723537/
https://live.staticflickr.com/65535/50364723537_b6112b3aa7_s.jpg
2019-01-16_11-48-14_IMG_8257
https://live.staticflickr.com/65535/53783595993_499c540a4b_b.jpg
https://www.flickr.com/photos/57897385@N07/53783595993/
https://live.staticflickr.com/65535/53783595993_499c540a4b_s.jpg
cave-IMG_2355

This tent is too heavy for backpacking or biking, but I’ve deployed it on many vehicle-based camping trips, including the California mountains and at Toorcamp in Washington. It’s sturdy, dead simple to deploy, and easy to clean, though the narrow door doesn’t do it any favors. It’s the first and the most eye-catching design by Heimplanet, and it got me hooked on the whole idea of inflatable tents.

Large Tent (The Backdoor) – 6.2 kg / 13.7 lb (4-Season)

  • About 3.5 minutes to inflate with small pump.
  • Decent weight-to-space ratio. Twice as heavy as Fistral but with 3x the space and a higher ceiling.
  • Pocket arrangement has indoor/outdoor division, same as the Cave.
  • Large enough to deploy a large bed, unpack gear, and comfortably use a chair at the same time.
  • Almost enough vestibule space to enclose an entire bicycle!
  • Semi-reliant on guy lines.
  • Can remain standing even without guylines if one of the four struts fails, though it will list somewhat.
  • Ventilation options are very good, even better than the Fistral.
  • Good in rain and wind and snow if guy lines are used.
  • Has a very large footprint:
    • Too large for almost all indoor deployments.
    • So large it may upset other people competing for space.
    • Difficult to find a patch of flat ground this large.
  • Color scheme matches my bike!
https://live.staticflickr.com/65535/50363927383_0f9ea57a14_b.jpg
https://www.flickr.com/photos/57897385@N07/50363927383/
https://live.staticflickr.com/65535/50363927383_0f9ea57a14_s.jpg
2018-06-26_21-47-38_IMG_6985
https://live.staticflickr.com/1763/42534956405_4b8dc79f71_b.jpg
https://www.flickr.com/photos/57897385@N07/42534956405/
https://live.staticflickr.com/1763/42534956405_4b8dc79f71_s.jpg
Huzzah, the tent is repaired!
https://live.staticflickr.com/65535/52327280636_3721e86953_b.jpg
https://www.flickr.com/photos/57897385@N07/52327280636/
https://live.staticflickr.com/65535/52327280636_3721e86953_s.jpg
2022-08-05-193022-IMG_3250

Huzzah, the tent is repaired!

It was a small campsite but the parking space was big.
https://live.staticflickr.com/65535/52327528298_48e592608a_b.jpg
https://www.flickr.com/photos/57897385@N07/52327528298/
https://live.staticflickr.com/65535/52327528298_48e592608a_s.jpg
2022-08-08-175541-IMG_4989

It was a small campsite but the parking space was big.

https://live.staticflickr.com/65535/50200362456_ca49073a11_b.jpg
https://www.flickr.com/photos/57897385@N07/50200362456/
https://live.staticflickr.com/65535/50200362456_ca49073a11_s.jpg
2020-08-03_20-38-19-48-07-00_E33A6339
https://live.staticflickr.com/1770/43391656032_4bc01368c7_b.jpg
https://www.flickr.com/photos/57897385@N07/43391656032/
https://live.staticflickr.com/1770/43391656032_4bc01368c7_s.jpg
https://live.staticflickr.com/65535/53903927397_6c52d538bb_b.jpg
https://www.flickr.com/photos/57897385@N07/53903927397/
https://live.staticflickr.com/65535/53903927397_6c52d538bb_s.jpg
2024-07-28-183651-IMG_2653

For one person this is overkill, and for two it’s luxury. You can stick the equivalent of a queen size bed in here and still have room for your stuff. Far too heavy for bike touring, but it’s been part of my standard car camping gear ever since it was introduced.

Very Large Tent (The Nias) – 6.8 kg / 15 lb

  • About 4 minutes to inflate with the small pump.
  • Requires laying out with four stakes before inflation, but additional stakes are optional.
  • Each side is large enough for two adults to sleep comfortably, as long as they face towards the inside door. Three could fit (total of six), but it could get awkward.
  • Average weight-to-space ratio.
  • Average ventilation. Large mesh door but side flaps are small.
  • Enormous central area for storing gear. Almost wide enough for two loaded bicycles side-by-side.
  • Extremely large footprint.
    • Too large for indoor deployment.
    • So large it may upset other people competing for space.
    • Difficult to find a patch of flat ground this large.
  • Far too heavy to be practical to bike tourists.
https://live.staticflickr.com/65535/53783596098_91b2becabd_b.jpg
https://www.flickr.com/photos/57897385@N07/53783596098/
https://live.staticflickr.com/65535/53783596098_91b2becabd_s.jpg
nias-IMG_2334

This is the only tent Heimplanet makes that absolutely requires stakes. Without them, the sleeping areas will not take their shape.

Conclusions

Based on the above, it seems to make the most sense to travel with the Fistral through remote areas, use the Kirra for more rural camping, and use the Backdoor only when traveling with three or more companions.

This is a little disappointing, since the Backdoor is luxurious to use. Lots of ventilation, tons of space, room to work inside, a giant vestibule for cooking… It’s too bad it weighs so much, because if I’m going to be living in a tent for months at a time, I’m going to need a place that can feel like a home.

Postscript: A giant vestibule makes the Fistral an ideal one-person touring tent!

Since my first few rounds of using the Fistral I’ve discovered that it’s possible to clip a lightweight tarp to one side of it and use the tarp to cover a bicycle parked parallel to the tent, with most of my gear still on it.

With the tarp attached, the Fistral is basically a good-sized one-man tent with a rear vestibule that’s larger than the living space. When the edges are staked down on opposite ends of the bike, the entire bike forms the outside wall of the vestibule, keeping the contents – bike included – safe from rain, and easily accessible through one of the doors in the tent. It’s also ventilated enough for cooking.

With the bicycle visibly concealed and staked down it is far less likely to be snatched by thieves, and I never have to worry about a wet seat or chain when I pack up in the morning.

I’ve deployed this tent dozens of times over multiple trips and years, and it’s worked brilliantly.

https://live.staticflickr.com/65535/50364618451_c0c0bf8998_b.jpg
https://www.flickr.com/photos/57897385@N07/50364618451/
https://live.staticflickr.com/65535/50364618451_c0c0bf8998_s.jpg
2018-08-16_12-12-21_IMG_7464
https://live.staticflickr.com/65535/50364608721_0db53566de_b.jpg
https://www.flickr.com/photos/57897385@N07/50364608721/
https://live.staticflickr.com/65535/50364608721_0db53566de_s.jpg
2018-08-15_21-53-01_IMG_7462
https://live.staticflickr.com/65535/50364613361_73fc90109a_b.jpg
https://www.flickr.com/photos/57897385@N07/50364613361/
https://live.staticflickr.com/65535/50364613361_73fc90109a_s.jpg
2018-08-15_23-45-14_IMG_7463
https://live.staticflickr.com/65535/50363870303_726fae6cfd_b.jpg
https://www.flickr.com/photos/57897385@N07/50363870303/
https://live.staticflickr.com/65535/50363870303_726fae6cfd_s.jpg
2018-11-12_01-48-07_IMG_7895

Old-skool chrome Bacchetta handlebars

Bacchetta makes – or perhaps only used to make – multiple sizes of handlebars for their recumbent bikes. I ride with the handlebars much closer to my chest than they recommend, and rest my arms across the tops of the bars when I’m going straight — which is most of the time. The only size of handlebars that works for this purpose is the smallest size.

Long ago, Bacchetta used to make their handlebars with a shiny finish, by polishing the aluminum after bending it into shape. Now they use black anodized aluminum instead, with a rough texture. I suppose they switched to black because it looked better with more colors, but a consequence of this change is, the new bars less comfortable on the skin.

Since I ride with my wrists and hands in contact with the bar itself most of the time, this difference matters to me. So when I built Valoria II, I started with a stock pair of handlebars, then swapped my old ones over when the time came.

A pair of ancient chrome handlebars on top of a pair of small-size anodized handlebars. They're exactly the same except for the chrome finish.

It was a pretty involved process. I had to remove three mounts, two handlebars and bar-end caps, two brake controls, two shifter controls, the mirror, and the anchor plate. I’m not just riding with handlebars, I’m riding with a whole dang dashboard!

In the end, it was worth it. The chrome feels cool on hot days, and clings to my gloves on cold days.

If I lost my bike and had to rebuild it from scratch, I could actually get everything I need brand-new from a variety of suppliers, with the glaring exception of these handlebars. They were only made for the first-run Bacchetta recumbent circa 2001. If I had to find another pair, I’d have to scour the entire country, and most likely I’d have to buy the entire bike just to plunder the handlebars and resell it. Eventually they will all go the way of the old Bacchetta under-seat rack: They’ll all get broken or lost, and then they will be gone forever.

This is one of the many reasons why I lock my bike up with a very serious hardened-steel segmented lock! Arrr!!

Customized bike (and camping) speakers

It’s hard to find good, versatile hardware, and sometimes the thing I want just doesn’t exist, so I have to get all crafty. This is another of those things I’m documenting for my own reference, in case I need to recreate it.

Bluetooth is the new hotness, but wires still sound better - and use less power.

These are the iHome iHM79BC Rechargeable Mini Speakers. They sound good, pack reasonably small and light, and the design is simple. I’ve used them on many overnight hotel stays, arranged on a nightstand or next to a bathtub, and I’ve set them up in the middle of the picnic table on camping trips.

But I wanted to use them in even more places, including in a tent, and anchored to my bicycle. Here’s how I modified them.

First thing to do, of course, is take them apart. See that little screw visible underneath the lid? There are three of those. I found it pretty easy to bend the lid out of the way and remove them all. With those out of the way, the bottom of the speaker popped off.

After drilling the holes; before installing the ziptie.

Powered by a standard 500mAh 3.7v LiOn battery pack.

There’s a little magnet glued inside the base that I pried out with a screwdriver to save some weight. The battery rests on top of the base inside the speaker, and with the base out of the way it falls out. I had to be careful not to yank the tiny wires that linked it to the circuit board.

By the way, if you want, you can swap out the rechargeable batteries at this point, and solder in some fresher ones. There are a variety of 500mAh 3.7v lithium batteries available via Amazon for example. It’s a pretty standard size.

I wanted to add loops to the sides of the speakers so I could hang them from hooks in a tent, so I got a little drill and made two holes in the side of the shell, just a little lower than the underside of the circuit board. (You can see them near the top of the photo.) Then I threaded a small ziptie through the holes, tightened it into a small loop, and clipped off the excess plastic.

With the ziptie in place, I stuck the battery on the base and pushed it back into the bottom of the shell. It only took a little bit of fiddling to get the ziptie on the right side of the plastic post inside. Then I put the screws back in.

But the fun wasn’t over yet! I also glued a Quad Lock adapter to the bottom of each speaker.

Now I could use the speakers with my laptop, or by my bedside, or on the ceiling of my tent, or on my bicycle! Huzzah! Here’s how they look:

Ready for some sing-along riding!

Perfect stereo for an audience of one ... and loud enough to irritate others too!

Yeah I guess the wires make it a little messy. But it sounds great!

Adding a 20t chainring

When you pedal a bike, your feet push pedals. Those pedals turn on arms. Those arms are called cranks. The cranks are attached together, and in the middle you have one or more rings with teeth on them, around which the chain moves when you pedal the bike. The whole apparatus is called a crankset, and those rings are called chainrings.

For example, this is the standard Bacchetta Giro 20 crankset with three chainrings on it. The chain is currently on the middle ring. The standard Bacchetta rings have 50 teeth, 39 teeth, and 30 teeth, from largest to smallest. This was the crankset on Valoria, my original Giro 20.

On the left you can see a Shimano Deore M590 crankset, with 44, 32, and 22-tooth chainrings. This is the crankset I installed on Valoria II. Having a 22-tooth ring in the smallest spot instead of the standard 30-tooth ring allows me to spin the pedals about 40% faster and still put out the same amount of power. That means I can carry all my touring gear up hills more easily. I can drop my maximum speed lower without straining my knees. My experience has shown me that with this chainring I can slow down to about 2.5 miles-per-hour and still keep the bike steady.

On the right you can see a 20-tooth chainring. This is what I intend to install onto the Shimano Deore M590 crankset, swapping it out with the 22-tooth chainring. It will speed up my cadence by 10% on top of the 40% speedup I already have.

Why is this worth doing? Why does this matter to me? I think the best way to explain this is with an experiment:

Take your bike outside. Now stack eight full-size bricks on the back of it. Yeah, the kind of bricks you build walls with. Now, get on the bike, and pedal those bricks up the steepest hill you can find, over and over again, until you’ve climbed the equivalent of 2000 feet with those bricks. Now repeat that exercise every day for two weeks.

Long-range bicycle riders are all a little bit crazy, because this is what they do. They make it manageable by climbing as slowly as they can. After a hundred hours pedaling like this, you are ready to do whatever it takes to go even a little bit slower; oh yes! If you’re lucky you can go slow enough that your digestion can actually keep up with this all-day energy demand, and you won’t starve to death right there on your bike! I’m only sort of joking.

So yeah, I’m putting this gear on. I’m going as low as I can go.

But this is a tricky operation, because the Shimano crankset isn’t designed to hold a ring that small. If I just bolted the new ring on without doing anything else, the chain would lay very awkwardly against the four posts holding the ring, and wouldn’t mesh with the teeth. The chain would slip along the ring unpredictably, or slip entirely off, causing me to lose control and crash the bike. And the chain itself would quickly become damaged as well.

So what I’m gonna do is, take the cranks off the bike, remove the 22-tooth ring, shave down the four posts with a Dremel tool, and put everything back together with the 20-tooth ring instead.

First things first. I’ve switched gears on the bike until I’m on the smallest front gear. Now I’m using my smallest L-shaped hex wrench to pull the chain off the gear as I turn the cranks, so the chain ends up resting on the boom of the recumbent. I want that greasy thing out of the way while I work.

This little wingnut gadget is called an “Adjusting Cap Tool“. It’s for removing the plastic plug on the left end of the axle, where the left crank is attached. Not something I’m going to be doing all the time, but something that definitely goes easier if I have this fancy little tool. When I removed the plug, I observed that it’s actually screwed in very loosely. I need to remember not to tighten it very much at all when I’m putting it back on later.

These items are strictly optional, but help the work go faster. The big thing is a combination speeder/breaker bar. Essentially a jointed handle that you can use to apply a lot of force and unstick bolts, or spin around like a crank to screw in bolts quickly. It’s the macho version of a wrench. The two smaller things are a 3/8" to 1/4" adapter and a 5mm hex bit socket. I used them like so:

I did not need to remove the bolts holding the left-side crank, I only needed to loosen them two or three turns. Then I used the Adjusting Cap Tool again:

There’s a little metal safety catch on the left-side crank. It’s a last line of defense to keep your crank from sliding off if you forget to tighten the bolts or one of them somehow breaks. Using the little ridge on the side of the Adjusting Cap Tool, I lifted it up, so I could pull the crank off.

With the left crank removed, the rest of the crankset can be pulled out from the right side.

At this point I sat down with the crankset and started tinkering. I had a 30-tooth chainring that I tried swapping out with the 32-tooth ring, but that didn’t fit. I gave up on it and removed the 22-tooth ring, and bolted the 20-tooth ring into place.

Marking the bolts with dots, clockwise, so they can be placed back in the same sockets afterwards. Also marking the region on each bolt to be shaved off.

With the bolts tightened down, the next thing I did was use a permanent marker to label the bolt heads, so I could shave them down the same way I was going to shave down the posts. Once they were marked I removed them again, and took off the 20-tooth ring, and prepared for carving.

This is a Dremel tool with a tungsten-carbide tip, specially designed to carve metal. You can get both for under 40 bucks, and they are well worth it. Being able to easily carve metal, plastic, and wood is a weirdly liberating ability.

Note also the earplugs. Gotta have those. Carving metal can be loud as heck.

I put in the earplugs, wrapped the crankset in a rag, set it on my lap, and began carving the four inner posts down with the Dremel tool, cutting a good-sized notch away from the outer edge of each post.

I had a hunch that I’d need to cut the notches deeper, but this was a good start. I moved on to the bolts.

By sticking a bolt sideways in a pair of vise-grips with the marking line on the outside, I was able to run the Dremel tool along the edge and smooth it down very easily. It only took a few minutes to do all four bolts this way.

I did the carving outside over a section of driveway next to a drain, and then I poured water on the ground to wash the aluminum dust down the drain, and then I washed the aluminum dust off the crankset. Then I took a shower and changed my clothes. I don’t want aluminum alloy dust on my skin or in my lungs, or on my cat’s feet!

Then I reassembled the whole crankset, with the new 20-tooth ring and the bolts in place, placed the chain on the ring, and rode around for a few minutes.

The result: Easily visible grease marks on all the spots where I needed to shave away more metal.

I took the crankset apart again and shaved away all the spots that had accumulated grease. Then I reassembled it for a second time, and did another test.

No grease marks this time. The shaved bolts and notches were perfect — and no bigger than they absolutely needed to be. I was definitely compromising the structural integrity of the lowest gear on my crankset, but at least I wasn’t compromising it more than I had to.

For the final assembly I made sure the bolts were tightened according to the instructions, and re-applied a bunch of lubricant.

Mission accomplished! So, what did I gain?

I loaded 65 pounds of gear onto the bike, using both racks and a backpack. Then I took a ride around Oakland, deliberately aiming for really steep hills. To my astonishment, I could pedal up all of them comfortably. My previous minimum speed had been about 2.5mph. Now I could drop all the way down to 1.9mph without losing stability. That is slower than a casual walking speed!

I know, I know. You’re saying, “what kind of brain-damaged lunatic actually wants to pedal a bike that slow, for hours at a time?” Well, before you judge cycle tourists, consider those people who run in place for hours every week on a treadmill inside “fitness centers”, looking at a television, or staring at a wall. At least we’re outside!

In traffic!

… Okay, yes. We are lunatics.